|
|
Audeonic |

Audeonic Home |
Understanding the MidiBridge Stream Byter |
|
The 'Stream Byter' module is a powerful tool for transforming MIDI events passing through a port. By entering transformation rules in a text based script style language, it is possible to rewrite, clone or block any incoming message. The Stream Byter allows you to do such things as:
With power, unfortunately, comes complexity and to program the Stream Byter requires familiarity with the MIDI protocol at a byte level. This guide will attempt to explain in detail how rules are constructed and also provide some recipes for some of these 'interesting' transformations. If you are not ready to write your own rules, then fear not, as we can write rules for you which can be copied from an email and pasted into the Stream Byter. If there is something you are trying to do, why not post your requirements to our soapbox forum and we or other MidiBridge users will try and construct suitable rules for you to configure your copy of MidiBridge with. Let's begin. Here is the Stream Byter configuration page: 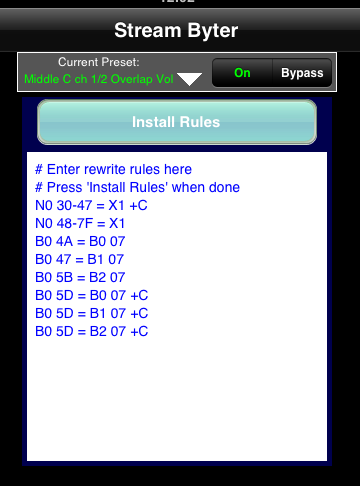 An editable text area is where you paste/edit your rules for events passing through the port on which it is configured. You get to this page by touching the 'beaker' button on the port where you want the transformations to occur. To help you remember what the rules do, it is possible to comment the rulesets. You simply add a '#' symbol before any commentary. You can comment on a new line or after a rule: Rules will be detailed in a moment, but when you want to install or test your rules, you press the 'Install Rules' button. If any of your rules are not valid, then you will see something like: 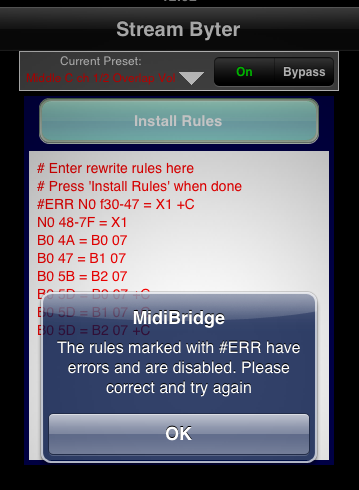 You'll notice the rule in error has been commented out and prefixed with 'ERR'. To fix a rule, correct it and press 'Install Rules' again. If a rule was marked with '#ERR' and you correct it, there is no need to remove the '#ERR' part yourself, as the rule checker knows this is a correction and will remove the '#ERR' for you before checking the rule again. If all your rules are valid, then the edit area text will appear in blue and the rules are now active. Do remember to save your rules into a preset so that you can recall your ruleset on other ports too. That is how you enter rules, now lets look at how to create them. Rules must be of the format: On the left of the equal sign is where you specify what to look for on an incoming message in order to apply the transformation to the message as specified in the output clause. Essentially, if an incoming message matches the input clause, then the output clause is applied to it. The Stream Byter evaluates each rule in order from top to bottom and the current message (which could have been modified by a prior rule) is used to match against the input clause. Here is a simple (but fairly silly) example which maps all events coming in on channel 1 to channel 3 having mapped to channel 2 in the process: The exception to this evaluation order is when rules have optional flags set, but we will look at that later. The input clause is made up of 1, 2 or 3 hex bytes that correspond to a MIDI message. The more bytes in the clause, the more finer the matching. Here are some single byte input clauses (these are not valid rules as they do not have and equal sign or output clause!) The above examples have introduced wildcards and ranges which can be used to fine tune the event matching:
The second byte in the input clause relates to the second byte of the MIDI message. It can be a fixed value, wildcard or range. Here are some examples: Finally, adding a third byte to the input clause (fixed, wildcard or range) increases the matching granularity. Some examples: The output clause is what determines what happens when an event is matched by the input clause. Here you specify what values will be written into the message. The output clause can be 1,2 or 3 bytes and the 'X' wildcard character is used to denote that the original value is to be preserved. Here are examples of 1,2 and 3 byte output clauses: Finally, flags can be specified at the end of each rule. The available flags are:
Let's put all of the above together and create some real-world example rules that will hopefully put things into prespective: Remap all events on channel 1 to channel 2 Duplicate all events on channel 1 to channel 2 Block all active sense messages: Split the keyboard on channel 1 into 4 zones going to channels 1-4 Overlapping split, 2 octaves around middle C to channels 1 & 2 Mirror channel volume changes on channel 1 to channels 2,3 and 4 Hopefully, this will get you going with the Stream Byter module. We have produced a short video showing how to setup an overlapping keyboard split and controlling the volumes of channels separately and conjoined on our youtube channel If you are having any issues with the Stream Byter, do please contact us or use our soapbox forum. |

This page does not use frames, cookies, java or plugins and should be viewable with just about any browser. Last updated 30 July 2022 (probably by hand using vi) |