|
|
Audeonic |


Audeonic Home |
Understanding MidiBridge Modules |
|
MidiBridge first introduced event filtering on every port. With version 1.4, this concept has been expanded to perform commonly used event modification used by musicians/MidiPhiles. Use modules to:
So, not only can you use MidiBridge to interconnect MIDI streams from physical interfaces, wi-fi and apps with virtual MIDI, you can now apply comprehensive filtering and transformation on the event streams too! First, the module rack When you touch the beaker icon
Here are the modules available on sources (inputs): 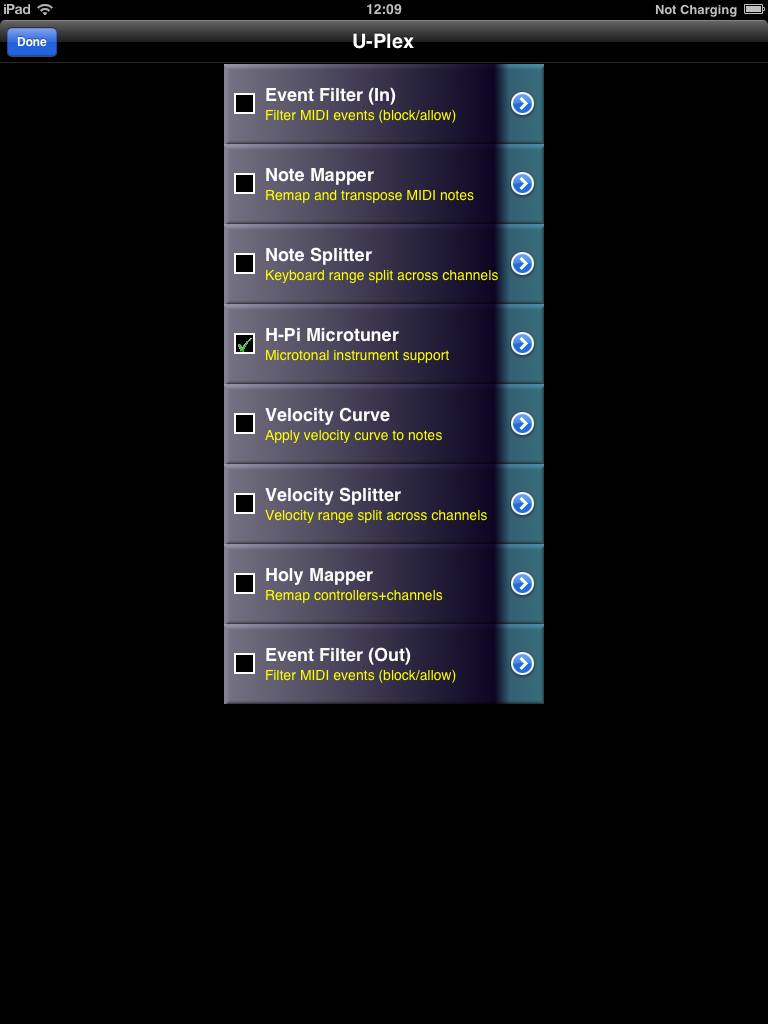 Events pass through the modules from top to bottom and events received by each module are the output events of the previous module. What this means is that events are modified cumulatively in the rack order by all active modules. A module will only act on events if it is 'On', which from the rack view means it has a green tick in the little box (like H-Pi Microtuner above). If the little box is blank, then the module is bypassed and does not act upon events. Touching a module will toggle its On/bypass state. Pressing the accessory button (arrow on the right) will allow you to configure that module in a new window.  The top line of a module (in white) is simply the name of the module. The bottom line either shows a brief description of what the module does (in yellow), or, if a preset is loaded into that module (see further) then the name of that preset is shown instead; a green preset name indicates that a preset has been loaded and no unsaved change to the preset has been made. If the preset name is in red, then a preset was loaded, but the module's configuration has been changed from that preset but the new configuration has not been saved. Also, preset names are enclosed in square brackets in case you have difficulty distinguishing green from red from yellow. With the rack view, you can see at a glance all the modules, whether they are on/bypassed and any presets (saved/unsaved) loaded for a module. What modules are there? The modules available in this version of MidiBridge are:
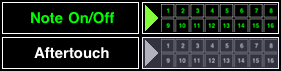
When one or more modules is enabled on a port, then a badge 'On' is displayed on the port on the Interfaces page to remind you that the port has active modules. In addition, if any module blocks an event, then this badge will flash (instead of the port) to show you an event was received but was not passed on. No flashing will occur if you have turned off the Visual Events option in MidiBridge Preferences. Each module will be examined in more detail, but first let's describe the: Module presets When you touch the accessory button on any module a new window is displayed that is unique to that module for configuring it. However, each configuration window shares the same feature for managing presets. A preset is simply a snapshot of a module's configuration that can be used again. Lets examine the top section of a configuration window for managing presets. The preset manager is an expandable/collapsable picker window and when you view a configuration page, it will be collapsed at first: 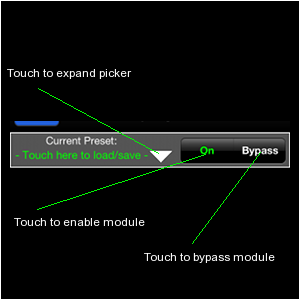 Not only does it allow you to manage your presets, but also provides buttons to bypass/engage that module (this is the same as touching the module in the rack view). If a preset is already loaded, then its name will appear under the 'Current Preset' label. If the name is in green, then the configuration of the module is unchanged since the preset was loaded. If it is in red, then the configuration has changed since the preset was loaded. If no preset is loaded, then the label simply invites you to: Use the small white triangle to expand (or collapse) the preset picker. You need to expand the picker to load, save or delete presets. Here is the picker expanded: 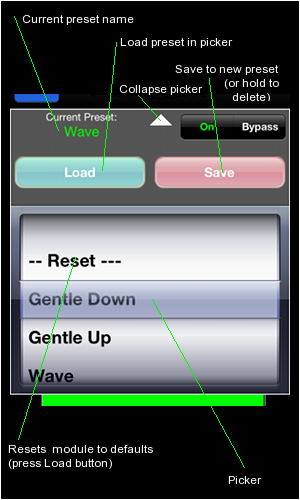 Once the picker is expanded you can now load an existing preset by selecting it with the wheel and pressing the 'Load' button. This will automatically enable the module if necessary. A special preset '-- Reset --' is also available. Loading this preset will set the module to a default factory state (and bypassed). To save the current module configuration to a preset that you can reload into the module again, press ther 'Save' button and you will be prompted to name your new preset. If a preset is already loaded, then that preset's name will be pre-populated in the preset name field for you. If you save to a pre-existing preset name, then the old preset will be overwritten with the current configuration. To delete a preset, select it in the picker and then hold down the 'Save' button for about 3 seconds and then release the button. Now, let's look at each module in turn. Event FilterThe Event Filter module allows you to filter out (or in) certain types of MIDI events from passing through the module. Note! When a filter is activated for the first time, the default setting is to block no events (pass-thru) This section describes each control and how it affects the module:
Event Filters can be used to split events from one input into multiple outputs. Simply connect the input to the outputs and then set an 'allow' filter on each output (or block filter) to allow only the desired channels for that output to be forwarded. With keyboard controllers (or other devices) that send active sense messages, you may find that blocking TimeSong events on that input (and thus filtering out active sense) will improve performance. Note MapperThe Note Mapper module remaps any MIDI note event to a different note event. This module can be used to remap drum machines/instruments to different notes that might be expected by another device or app, for example an XG drum set to Nanostudio's TRG. Additionally, you can use this module to transpose all notes (NB. after they have been mapped) up or down a number of semitones. Note Mapper and many other modules allow you to select values using a 'selector' widget: 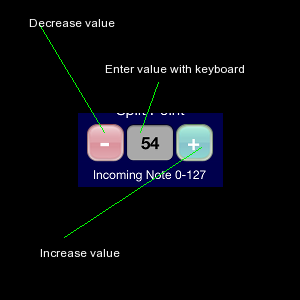 The minus button decrements the value in the grey box, and the plus button increments this value. You can also enter a value via the keyboard by touching the grey area. To remap one MIDI note to another, you first select the incoming MIDI note you wish to map using the left selector widget. You then use the right selector widget to select the note that the incoming note should be remapped to. Repeat this for as many mappings as you need. 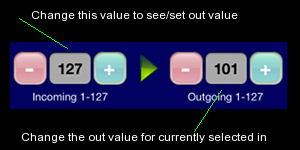 The number in the selector widgets for note numbers refers to the decimal MIDI notes ranging from 0 to 127. The note name (starting from C-2 for note 0 and ascending to G8 for 127) is shown above the selector widget. To add global transposition of notes passing through this module use the Note Transpose selector widget to set a transpose value in semitones. At the bottom of the screen is an out/in indicator matrix which provides an overall picture of the current mappings. If a note is remapped then a red bar on the 'In' axis corresponding to the Out value on the Out axis is displayed. If no mapping takes place for a note, then the bar is green. This graphic is an indicator only. Touching it has no effect. Note SplitterThe Note Splitter module allows you to define a keyboard split point (note based) and then have notes that fall on the lower split be mapped to one MIDI channel while notes on the upper split can be mapped to a different channel. You set the split point by using the Split Point selector widget or touching the keyboard at the bottom of the panel: 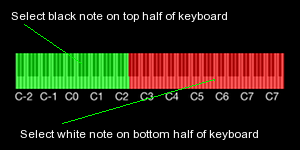 The lower split is marked in green on the keyboard and the upper split is marked in red. The lower split includes the note at the split point. If you set the split point to zero, then the lower split is disabled entirely and only the upper split is in effect. This setting is used when you want to remap all notes to a particular channel. For both the lower and upper splits you set the desired MIDI channel using the two selector widgets. You may also select 'off' as the MIDI channel for a split, in which case the note is blocked and not passed H-Pi MicrotunerH-Pi keyboards are microtonal instruments that send untuned MIDI notes. MidiBridge is capable of retuning the output of these keyboards so that they can be used with apps (eg. Arctic Keys, bs16-i and Thumbjam) and iOS MIDI. For full details about these keyboards and how microtonal retuning works, please see the H-Pi site at H-Pi Instruments. MidiBridge recognises the USB U-PLEX keyboard automatically and will activate the microtuner if this device is connected. For other H-Pi keyboards connected via a MIDI interface, the user needs to manually activate the microtuner via the H-Pi Microtuner module.The controls are as follows:
The 'Init Pitchbend' button sends pitchbend initialisation messages on all engaged channels to all connected interfaces. This action sets the pitch bend range to one semitone. Note, this initialisation also occurs when a new device is connected/seen or if you navigate away from the H-Pi Microtuner panel. Velocity CurveThe Velocity Curve module allows you to apply scaling of the note velocities as they pass through the module. You can draw using your finger a curve or line on the plot to set a curve, and then use the selector widgets to refine your curve. In essence, the module maps the velocity of a note to a different velocity based on the incoming velocity. 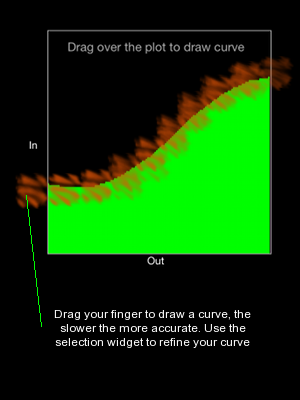 Velocity values are specified in MIDI decimal values from 1 to 127 (as velocity zero means note off) Some preset starting points for velocity curves have been included as factory presets courtesy of Breeze. Velocity SplitterThe Velocity Splitter operates in a similar fashion to the Note Splitter, but the velocity of the note determines the destination channel. You can specify a split point using the top selector widget or touch the green/red area to set the velocity split point. Notes less than the split point velocity will be sent to the channel specified in the Lower Split selector while notes higher than the split point will send to the Upper Split channel. Here also, you may also select 'off' as the MIDI channel for a split, in which case the note is blocked and not passed Holy MapperNot a religious reference but named after the customer who suggested this, the Holy Mapper maps controllers and channels interdependently. In other words you can map controller X on channel Y to controller X1 on channel Y1. Simply use the left selector widgets to select the incoming controller/channel combination you wish to map and then adjust the corresponding output controller and channel to suit. Memory Usage - Usually when MidiBridge runs, it uses about 12Mb of memory on the device. However, this can increase if the user accesses module configurations, as the app needs to load in the views to support these. If memory is at a premium, it is suggested that once the modules are configured, you press the home button to send MidiBridge to the background and then terminate it using the double-tap on home task manager. Restart MidiBridge and it will revert to the configuration it had prior to being terminated but only use 12Mb of memory. That brings us to the end of the guide (the astute among you will have noticed that we cheated a bit and just included the prose from the manual for the actual filter descriptions). If you have ideas for other modules that we could add to MidiBridge please get in touch as it is relatively easy (codewise) to add in new modules. |

This page does not use frames, cookies, java or plugins and should be viewable with just about any browser. Last updated 30 July 2022 (probably by hand using vi) |