) after setting up.
MidiBridge has 5 tabs at the bottom of the screen:
 |
Interfaces, which shows all the MIDI ports in the system and is where you
connect inputs to outputs and set port filters and names. |
 |
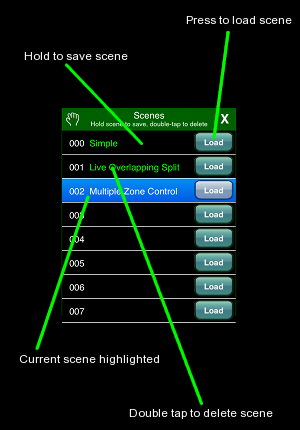
Scenes,
which allows you to define and recall MidiBridge configurations from the application
or via MIDI program change message. |
 |
Preferences,
which allows you to configure options and connect to CoreMIDI wireless hosts. |
 |
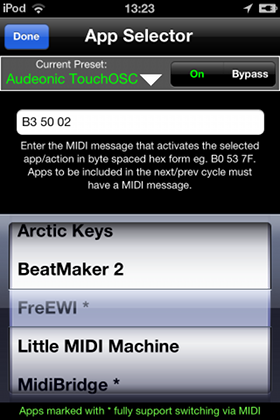
Applications,
which allows you fast switch to other MIDI/audio applications if installed, or explore
other fast-switchable/CoreMIDI apps that may be of interest. |
 |
Instructions,
your user guide - which you are now reading. |
Additionally, we have produced online guides for understanding MidiBridge and MidiBridge modules:
Interfaces
On the interfaces tab, you will find a set of MIDI inputs and outputs that have
been detected by the app. Inputs are on the left and outputs are on the right. If
your iOS device is running iOS version 4.2 or greater then you will have CoreMIDI
support. CoreMIDI network inputs and outputs have a wi-fi symbol embedded in them
for easy identification. CoreMidi virtual inputs and outputs have a virtual cable logo
embedded in them also. When the app starts, network CoreMIDI is enabled to permit incoming
connections from other hosts.
Each port (input or output) has three touchable areas:
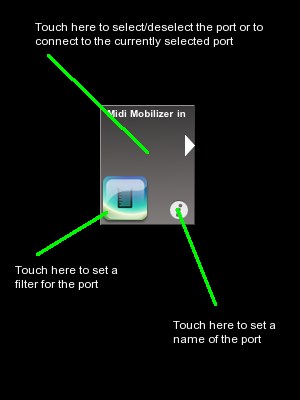
To connect inputs to outputs you do the following:
- Choose an input that you wish to connect from. It will
change to a green colour to show it has been selected.
- Now touch one or more outputs to connect that output to the
currently selected input. A green line from the input to the output
will be shown to indicate that the two are connected.
- Touch the orignally selected input (or another input) to deselect
that input.
The same procedure works in reverse if you wish to select an output
and connect a number of inputs to it. To break a connection you simply
repeat the above on a pair of inputs and outputs that are already connected.
Also, when you select a port, all connections to that port are highlighted,
so, if you want to see which ports an input or output is connected to you just
touch that port. Remember to touch it again to deselect it.
When MIDI events pass through a port (received on an input or sent from an
output), the port will flash briefly. The flashing can be disabled from the
Preferences window.
MidiBridge keeps track of the MIDI interfaces it sees and the connections
made between them and will restore any connections that were made previously.
Where a port has a double-tap icon  , then double-tapping
that port will fast-switch to that running application.
, then double-tapping
that port will fast-switch to that running application.
Naming of ports
You can define your own names for each port, for example the name of the
instrument or MIDI device connected to it. Just touch the  icon in the port and use the keyboard to change the name. The name you set
will be remembered and when MidiBridge is run again your own port
names will be restored.
icon in the port and use the keyboard to change the name. The name you set
will be remembered and when MidiBridge is run again your own port
names will be restored.
Port Modules
Each port (input or output) has its own set of transform modules (the module chain) that filter or transform the
events as they pass through.
To access the module menu
of a port, simply touch the  button.
The module menu lists all modules for that input or output in the order in which they will
process events. Each module lists its name, a description of what it does (in yellow) or the name of any
preset loaded (green/red) for that module. A module is active if it has a tick in the left tickbox; touch
the module to engage or bypass a module. To configure a module, press its accessory disclosure button.

The modules available in this version of MidiBridge are:
- Event Filter - block/allow filtering of events. There is one of these at the start of each module chain and another separate one at the end.
- Stream Byter - create user defined rules for matching and
transforming any MIDI message (except sysex)
- Program Changer - issue program change messages from
MidiBridge either manually or via scene change.
- Note Mapper - remap any MIDI note to any other and transpose MIDI notes
- Note Splitter - Keyboard split across channels
- H-Pi Microtuner - Support for H-Pi keyboards (on input ports only)
- Velocity Curve - Velocity scaling
- Velocity Splitter - Velocity split across channels
- Holy Mapper - Allows the interdependent mapping of controllers and channels.
When one or more modules is enabled on a port, then a badge 'On' is displayed on the port on the Interfaces page to
remind you that the port has active modules. In addition, if any module blocks an event, then
this badge will flash (instead of the port) to show you an event was received but was not passed on.
Module Presets
At the top of every module's configuration panel is an expandable/collapsable picker
for managing preset configurations of that module - ie. presets.
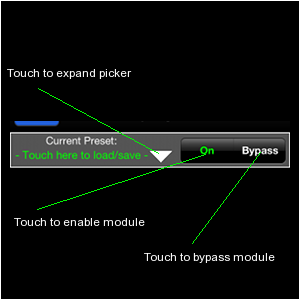
Use the 'On' and 'Bypass' buttons to enable or bypass the module.
Use the small white down-arrow to expand the panel to load factory or user saved
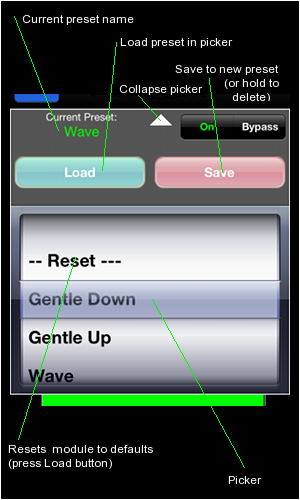
presets for that module. The arrow changes to an up-arrow when the picker is expanded.
Touch this to collapse the picker again.
If a preset is loaded, its name will appear under the 'Current Preset' label. If
the preset name is in green, then the configuration of the module has not been modified
since the preset was loaded. If the name is in red, then the module's configuration has
been changed from the preset. If no preset is loaded, then a message inviting you to expand
the picker to manage presets is displayed instead.
Once the picker is expanded you can now load an existing preset by selecting it with the
wheel and pressing the 'Load' button. This will automatically enable the module if necessary.
A special preset '-- Reset --' is also available. Loading this preset will set the module
to a default factory state (and bypassed).
To save the current module configuration to a preset that you can reload into the module again,
press ther 'Save' button and you will be prompted to name your new preset. If a preset is already
loaded, then that preset's name will be pre-populated in the preset name field for you. If you save
to a pre-existing preset name, then the old preset will be overwritten with the current configuration.
To delete a preset, select it in the picker and then hold down the 'Save' button for about 3 seconds
and then release the button.
Event Filter
The Event Filter module allows you to filter out (or in) certain types of MIDI
events from passing through the module.
Note!
When a filter is activated for the first time, the default setting is
to block no events (pass-thru)
This section describes each control and how it affects the module:
- Mode
The filter operates in one of two modes:
Allow
mode specifies that events which match the event
types/channels specified below are used. All events that do not match the
event types/channel matrix settings will be ignored. This type of filter
is generally used to focus in on a particular type of event stream.
Block
mode specifies that all events received are allowed unless
they match the event types/channel matrix settings. This type of filter is
generally used to exclude unwanted events from the capture/midi thru.
- Drum Remap (deprecated in 1.4)
This option is no longer present in this version of MidiBridge. Instead, you
use the Note Splitter module (a preset mapping channel 10 to 1 is included as
a factory preset) to remap channel 10 to another channel for use in apps like Sample Tank.
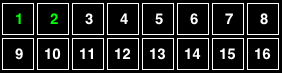
- Channel Matrix
The channel matrix (shown below) allows you to choose the channels that are
to be used in the filtering process. You select/deselect channels by touching them. In
itself the channel matrix does not specify the events to filter, but is used
in conjunction with the Event Type switches described in the next section.
- Event Type On/Off
Below the channel matrix are the event types that can be used by the
filter. The event types that can be filtered are as follows:
- Note On/Off - Note On, Note Off messages
- Aftertouch - Channel pressure, Aftertouch messages
- Controller - Channel Controller, Pitchwheel messages
- Program Change - Program Change messages
- Sysex - System Exclusive messages
- Time/Song - MIDI Time Code, Song Position/Select messages
Touch each of these event type buttons to toggle their inclusion (or not)
in the filter.
In addition, note, aftertouch, controller and program change event types
can be also checked against the channel matrix by toggling the mini channel
matrix button to the right of each of these types.
If the matrix button for
an event type is not selected then all channels for that event type are
included in the filter.
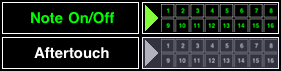
By way of example, the above two pictures show that Note On/Off messages are to be included in
the (Allow) filter and that only those note on/off events that are sent on
the channel specified in the channel matrix (1 and 2) will be considered.
Aftertouch messages will not be considered at all.
Event Filters can be used to split events from one input into multiple outputs. Simply connect
the input to the outputs and then set an 'allow' filter on each output (or block filter) to
allow only the desired channels for that output to be forwarded.
With keyboard controllers (or other devices) that send active sense messages, you may
find that blocking TimeSong events on that input (and thus filtering out active sense) will
improve performance.
Stream Byter new in 1.5
In response to the many varied requests we get for unusual event
transformations, we have developed this module to give users unparalleled
flexibility. Some of the things you can do with the Stream Byter are:
- Map any MIDI event to any other MIDI event (not sysex) including
type, channel and value.
- Create up to 128 non-contiguous zones per channel.
- Create overlapping zones.
- Split controller messages into channelised zones.
- Use note events to change MidiBridge scenes.
- More precise blocking of events than the event filter.
This is hardly an exhaustive list, but with flexibility comes some
complexity, and to use the Stream Byter you do need an understanding of the
MIDI protocol, but fear not, as because it is possible to paste rules from
an email, we can help by designing rulesets for what you are trying to
achieve and email them to you.
We have also produced a detailed tutorial for creating Stream Byter
rulesets (on our website) and you can also post queries about this (and of
course anything MidiBridge related) on our support forum, again, see our
website.
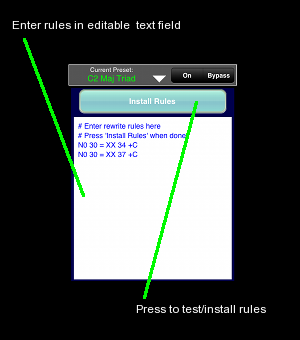
The Stream Byter panel contains an editable text window for you to define
rules to match and act on MIDI events. One rule per line is permitted and
you can comment your rules by preceding your commentary with a '#' symbol.
Once you have entered your rules, you press the 'Install Rules' button
which checks your rules for validity. If any rules are incorrect, these
are marked with 'ERR' and are commented out. To fix a rule with an error,
simply edit the line (no need to remove the '#ERR' part!) and press the
'Install Rules' button to try again.
Each rule consiste of two clauses, separated by one '=' sign.
The clause to the left of the '=' is the input clause where you specify
which MIDI events are to be considered.
The clause to the right of the '=' is the output clause where you
specify what happens to an event when it matches the input clause.
You can also specify flags at the end of the output clause:
- +C - clone the incoming message and apply the output clause to the
clone.
- +B - block the incoming message if it matches the input clause
Both input and output clauses are constructed by 1,2 or 3 separate
hex bytes depending upon the nature of the rule. Here are some simple examples:
# remap all controller events coming in on channel 1 to channel 2
B0 = B1
# clone all controller events coming in on channel 1 to channel 2
B0 = B1 +C
# remap controller 7 on channel 0 to controller 6 on channel 1
B0 07 = B1 06
# remap note C-2 to proram change 0 (on channel 1)
90 00 = C0 00
You can also specify wildcards and ranges in the incoming clause:
- The value 'N' in the first nibble of the first byte represents note on
and note offs (ie. 8 or 9)
- The value 'X' in the first nibble of the first byte represents all
event types.
- The value 'X' in the second nibble of the first byte represents any
channel.
- The value 'XX' for the second or third bytes represent any value (00-7F)
Here are some examples of wildcards:
# rewrite all events on channel 1 to channel 2
X0 = X1
# rewrite all note on/off messages on channel 1 to channel 2
N0 = N1
# collapse all notes on all channels to channel 1
NX = X0
# block active sense messages
FE = XX +B
# control controllers 6 & 7 with controller 6
BX 06 = XX 07 +C
# rewrite all program changes to program change 1 on same channel
CX XX = XX 01
You'll note that you can use 'X' and 'XX' wildcards in the output
clause. This signifies that the incoming corresponding value of the
event is to be preserved.
You can specify ranges of values using the '-' sign inbetween low
and high values. Examples:
# remap all events on channels 1-8 to channel 9
X0-8 = X9
# limit the max velocity on all notes on channel 1
N1 XX 40-7F = XX XX 40
These examples are quite simple and are to provide a foundation for
writing more useful real-world rules. Again, please do look at our tutorial,
post to our forum or email us if you would like help in creating custom
rules for your requirements. There is no doubt that this module is not for
the beginner.
Finally, some caveats to be aware of when writing rules:
- Rules are evaluated top to bottom and the results of each rule are
fed into the next (unless the clone flag is set).
- sysex messages are not supported.
Program Changer new in 1.5
The Program Changer module allows you to issue Program Change messages
on a per-channel basis. You can issue changes manually or have all program
changes stored issued automatically on a scene change.
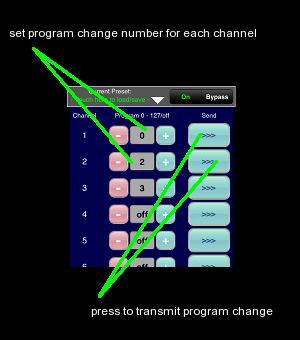
All 16 MIDI channels are listed separately and you setup which program
change message (0-127/off) will be transmitted on each channel.
To send a program change message manually, press the '>>>' button for the
corresponding channel.
However, where the Program Changer becomes more useful is when it is used
in conjunction with the scenes feature. By saving all your program changes
in a scene, when that scene is recalled, the program changes will get issued
immediately. That way, you can have external modules or apps (that honour
program change messages) be configured to the desired preset for the
particular scene.
Be aware that program change messages are issued directly and do
not pass through any modules.
Note Mapper
The Note Mapper module remaps any MIDI note event to a different note event. This module can be used to
remap drum machines/instruments to different notes that might be expected by another device or app, for example
an XG drum set to Nanostudio's TRG. Additionally, you can use this module to transpose all notes (NB. after they have been mapped)
up or down a number of semitones.
Note Mapper and many other modules allow you to select values using a 'selector' widget:
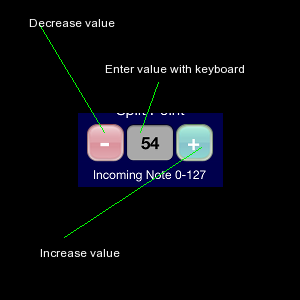
The minus button decrements the value in the grey box, and the plus button increments this value. You can also enter a value
via the keyboard by touching the grey area.
To remap one MIDI note to another, you first select the incoming MIDI note you wish to map using the left selector widget. You then use the right selector widget to select the note that the incoming note should be remapped to. Repeat this for as many mappings as you need.
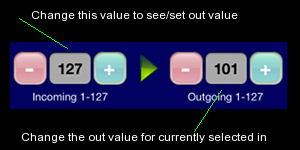
The number in the selector widgets for note numbers refers to the decimal MIDI notes ranging from 0 to 127. The note name (starting from C-2 for note 0 and ascending to G8 for 127) is shown above the selector widget.
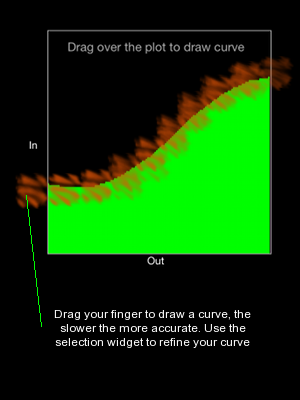
To add global transposition of notes passing through this module use the Note Transpose selector widget to set a transpose value in semitones.
At the bottom of the screen is an out/in indicator matrix which provides an overall picture of the current mappings. If a note is remapped then a red bar on the 'In' axis corresponding to the Out value on the Out axis is displayed. If no mapping takes place for a note, then the bar is green. This graphic is an indicator only. Touching it has no effect.
Note Splitter
The Note Splitter module allows you to define a keyboard split point (note based) and then have notes that fall on the lower split be mapped to one MIDI channel while notes on the upper split can be mapped to a different channel.
You set the split point by using the Split Point selector widget or touching the keyboard at the bottom of the panel:
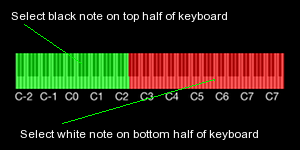
The lower split is marked in green on the keyboard and the upper split is marked in red. The lower split includes the note
at the split point. If you set the split point to zero, then the lower split is disabled entirely and only the upper split is in effect.
This setting is used when you want to remap all notes to a particular channel.
For both the lower and upper splits you set the desired MIDI channel using the two selector widgets. You may also select 'off' as the MIDI channel for a split, in which case the note is blocked and not passed
H-Pi Microtuner
H-Pi keyboards are microtonal instruments that send untuned MIDI notes. MidiBridge is capable of
retuning the output of these keyboards so that they can be used with apps (eg. Arctic Keys, bs16-i and Thumbjam) and iOS MIDI. For full
details about these keyboards and how microtonal retuning works, please see the H-Pi site at